Saturday, June 21

Salad of Freekeh, Broad Beans, Radish, Peas, & Herbs


Freekeh is just starting to make an appearance in mainstream supermarkets. Similar to Bulgar, wheat is harvested early and so remains green. This makes it difficult to hull, so the wheat is carefully piled up and burned in the fields removing the chaff and giving the grain a smoky flavour. Perfect to compliment a BBQ which is exactly what I used it for. 

Ingredients:
Freekeh - 100g
Broad beans - 100g podded weight
Peas - 100g
Radish - 10
1 clove of garlic - peeled and finely grated
Mint. Dill, Coriander - 1 small bunch of each
Lemon - 1/2
Olive oil

Method:
Blanch the broad beans for few minutes until just soft then refresh in iced water. Remove the leathery skin and set the beans aside. Remove the mint from the stems and finely chop with the remainder of the herbs. Bring 1 l of water to the boil and simmer the freekeh for 20 minutes until tender. Drain and allow to cool. 

In a large bowl juice the lemon and add the garlic, some seasoning and a large slug of oil. Mix well and add the freekeh tossing it through the dressing. Add the remainder of the ingredients, mix well, check the seasoning adding more lemon if you think it needs it. Serve.

Tuesday, June 3

Roast Chantenay Carrots, Butternut, Feta, Caraway, Cumin & Mint


I just bought the new Morito cookbook and I'm smitten. This is pretty much their recipe but with a few twists to adjust it to my palate. You don't need the butternut, up the quantity of carrots a bit - I just had too few carrots and a squash lurking in the fridge….!

Ingredients:
A small butternut - peeled, deseeded and cut into 1cm dice
Chantenay carrots, 250g - washed and cut lengthways into quarters
Feta - half a block
Cumin seeds, 1 tsp
Caraway seeds, 1tsp
Smoked paprika - a few pinches
Honey - 1tbsp
Rosewater - 1 tsp
Mint - a small handful of leaves, shredded
Half a lemon
Good olive oil

Method:
Toss the carrots, squash caraway and cumin seeds with a good slug of olive oil and some seasoning. Roast gently at 160c until nice and soft stirring occasionally. Add the honey, rosewater, a squeeze of lemon and taste. Plate up, sprinkle with smoked paprika, crumbled feta and the shredded mint. Drizzle with more good olive oil to finish.


Sunday, May 11

Warm Salad of Jersey Royals, Radish, Asparagus & Avocado, Crème Fraîche & Chives


Is it possible to toss together a more seasonal fistful of ingredients in one dish than I have done here? No….it is not….

Ingredients:
1 small ripe Hass avocado - stoned, peeled and roughly chopped
200g of Jersey Royal spuds, scrubbed
A bunch of English asparagus, woody stems removed.
A super fresh bunch of radishes
A little good olive oil

Dressing:
A small buch of chives
1/2 a small clove of garlic, puree'd or finely grated
A heaped tsp of dijon mustard
Zest of half a lemon, 1 tbsp of juice
3 tbsp of good extra virgin
1x 200ml carton of good quality crème fraîche
Salt and black pepper

Method:
Cook the spuds in gently simmering water until soft but not falling apart. Remove from the water and toss in the asparagus. After a minute or two, drain and set aside. Whisk together the dressing ingredients with 2/3 of the chives - season to taste.

Toss the warm spuds (halved if large), asparagus (chopped into bite sized pieces) and radishes (halved) in a little olive oil to glaze, season to taste. Spread half the dressing on the bottom of a serving plate and layer up the salad ingredients with the avocado (layering like this prevents the avocado breaking up and making the salad look messy). Drizzle over the remaining dressing and scatter over the last few chives.

Friday, May 2

Aubergine & Ndjua Parmigiana

I'm late to the party on this one. Ndjua is a spicy 'spreadable' Italian salami originating from Calabria. Like all men of a certain age, fashion trends quite often pass me by.  All the movers and shakers are onto the next foodie fad - probably Peruvian food - whilst I extoll the virtues of this great product to an audience who heard it all before, and several years ago.

My fridge contained a few wrinkly and past their best aubergines, some leftover passata, half a pint of milk and a parmesan end - it screamed Parmigiana at me. But I also had a jar of Ndjua I had been saving for a pizza or bruschetta topping. A well made Aubergine Parmigiana is a fantastic vegetarian dish to have in your armoury - truly delicious sloppy midweek comfort food. But the addition of this spicy, oily, deeply meaty spread was a revelation. The bowl in the picture is as large as it looks - it would serve four easily. My wife and I devoured it in less that 15 mins, with bread…..it was that good.

I bought my Ndjua from Carlucchio's, but I would guess any good Italian deli would stock it. I have to say that you could probably make a better version of it yourself if you have access to a load of salami ends. Simply minced and cooked out with onion, garlic, some fennel, chilli and a few well chosen spices, but the jar version was pretty good. 

Ingredients:
2 medium aubergines
50ml olive oil
1 ball of mozzarella
1/2 jar of good quality passata
1 small bunch of basil
1/2 jar of ndjua
200g grated parmesan
1/2 pint full fat milk
A large knob of butter
1 heaped tbsp plain flour
2 fresh bay leaves
1 clove
1 small onion - finely sliced
1/4 nutmeg - freshly grated
1 small palm full of black peppercorns
Pancetta or parma ham slices

Method.
First infuse the milk for the béchamel. Warm the milk to near boiling with the onion, bay, clove, nutmeg and peppercorns. Take off the heat and leave to stand for 1/2 hour before passing through a sieve. Retain the milk, discard the onion and herbs.

Slice the aubergines 1.5 cm thick, season lightly and gently fry in olive oil until very soft and lightly coloured on both sides. Place the aubergines on a chopping board and spread half with ndjua. Top with a few basil leaves and some torn mozzarella and another slice of aubergine to make a sandwich.

Pour half the passata into the bottom of a roomy oven dish, tear in a few more basil leaves and then put a single layer of aubergine 'sandwiches' on top. Squeeze them all i!. To finish the béchamel, melt the butter and flour together in a pan until combined. Turn up the heat and whisk in the milk. Bring to the boil whisking all the time until thickened. Drop the heat to very low and allow the flour to cook out for a few minutes. Add most of the parmesan and off the heat, beat into combine - taste and season. 

Pour the béchamel over the aubergine and top with the rest of the parmesan. Lay on some slices of parma ham or pancetta and bake at 180c until bubbling an golden on top - maybe 40 to 50 minutes.

Saturday, April 26

Chargrilled Purple Sprouting, Spring Onions, Asparagus & Jersey Royals


Some recipes are so simple that they really don't need writing down - this is one of those. Just use great tasting seasonal ingredients, your tastebuds and instincts. I whipped this up on the BBQ last week - first of the year! Char-grilling purple sprouting may sound strange but I nicked the idea of Josh Eggleton - a Michelin starred chef from Bristol. As long as you avoid blackening the broccoli, the taste is wonderful…….so:

Gently rub/wash the spuds and boil in gently simmering water until soft. Chop any woody ends off the asparagus and broccoli and toss in a little oil and seasoning. Char-grill with the onions until softened but still with some bite. Toss in a bowl with the still warm spuds and dress liberally with very good olive oil and a squeeze of lemon. Season, and throw in a handful of chopped soft herbs. I used tarragon, chervil and chives but basil, parsley or even coriander would work well.

Friday, April 11

Wye Valley Asparagus, Caramelised Onion & Parmesan Tart


Every spring a new asparagus recipe……just can't eat enough!

Ingredients:
1 large spanish onion, peeled and sliced very finely
50g butter
50g cream
75g parmesan
1 block of 'all butter' ready made puff pastry
6 thick stalks of asparagus
2 large very fresh free range eggs

Method:
Melt the butter in a roomy frying pan.  Over a low heat gently fry the onions stirring occasionally until they are ridiculously soft and dark golden in colour. This  can take up to 40 minutes so take your time. Add the cream and parmesan and allow to bubble away and thicken into a sauce like consistency. Season to taste and allow to cool to room temperature.

Heat your oven to 200c.

Roll out the pastry to the thickness of 2mm and using a large saucer cut two circles of pastry. Place these on an oiled baking sheet and top with the onion mix, half on each disc. Trim the asparagus of any woody fibrous ends and nip off any hard scales low down on the stalk with a small knife. Top each disc with three pieces of asparagus and bake for 15 to 20 minutes until the pastry is really golden and cooked underneath - flabby puff pastry is a friend to no-one.

Serve with simply boiled and buttered new potatoes, some dressed green salad and for the money shot……a beautiful soft poached egg on top of the tart.

Wednesday, March 26

Bacon Chops, Chestnut Mushrooms, Spinach & Cream


I stopped off in Salisbury the other day. Not out of cultural interest, more that my son was screaming in the back of the car and I could take no more. What a great little city this is, so much history and a cracking little farmers market. I brought all the main ingredients for this dish from local growers. The pigs are reared in the New Forest, the mushrooms cultivated nearby and the vegetables came from a farmer who lived just down the road. It is great to see a practical farmers market being well used by the locals. So often you find that farmers markets do not have the breadth of stalls to do the weekly shop. You can't create a meal from a couple of cup cake stands and a chutney stall…..take note market organisers!

Bacon chops are not that common but your butcher should be able to source them for you. They can be a bit salty, so if you are not partial to heavily salted foods then try soaking them overnight before cooking. For two:

Ingredients:
Bacon chops - 4, each weighing approx 100g or a bit more if bone in.
Spinach - 2 large handfuls, large stems removed, washed & shredded
Garlic - 1 small clove, peeled and finely grated
Banana shallot - 1 large one, peeled and finely chopped
Chestnut mushrooms - 100g, sliced
Butter - a good knob
Chicken stock - 250ml (shop bought is fine, a cube is not)
Cream - 100ml
Mushroom Ketchup - 1 tbsp

Method:
Heat a roomy frying pan over a medium heat and add a tiny splash of oil. Pan fry the fat on the bacon chops first to give colour to render some of the fat. I lined all four chops up and held them together with tongs to fry the fat. Turn flesh side down and pan fry on one side until golden, flip over and repeat on the other side. Remove from the pan and transfer to a warm oven (140c) to cook through whist you cook the sauce.

Pan fry the mushrooms in the butter until starting to colour. Add the onion and continue to fry until softened. Add the garlic and cook out. Deglaze the pan with the stock and reduce by half. Add the ketchup and season with pepper only (the chops are salty so you need to under-season the sauce). Add the cream and reduce until the sauce looks a little too thick. Add the spinach and allow to wilt, the liquid from the spinach should return the sauce to the correct consistency, e.g. coat the back of a spoon thick. Serve the pork on some rough mash with the sauce and vegetables spooned over. 

Sunday, March 9

Gnocchi with Red Kale, Taleggio, Chilli, Pine Nuts & Basil

Another idea for a midweek supper. It looks great on the plate and makes for really interesting eating as there are so many harmonious things going on. It is quite quick to pull together as you can cheat a bit and use ready made items. Is my home made gnocchi and tomato sauce better than that bought from the supermarket……well, yes. But this is a mid week supper and who wants to be making gnocchi after a hard day in the office when you are 'Hank Marvin' (rhyming slang for starving for the hard of Cockney). 

The Pizza Express tomato sauce is pretty good and (unsurprisingly) makes for a good and speedy pizza sauce. It only costs a quid so in reality it would be hard to make your own for less. Supermarket gnocchi is 'passable' but once jazzed up with all the other ingredients it all turns out fine. For four:

Ingredients:
1x 400g tin of Pizza Express Tomato Sauce
1 packet of ready made fresh gnocchi
100g pinenuts
250g talleggio cheese, cut into small chunks
2 large head of purple kale, leaves separated from stems
1 bunch of basil
2 mild red chillies, deseeded and shredded
Extra virgin olive oil
50g butter
2 fat cloves of garlic, peeled and finely chopped

Method:
Get a large pan of salted boiling water on the stove and bring back to a rolling boil. Warm up the tomato sauce in a small pan. And in a large frying or sauté pan, melt the butter and olive oil together over a medium heat.

Blanch the kale in the boiling water for a few minutes until soft - you don't want the kale undercooked as it makes for tough eating in the finished dish. While the kale is blanching, fry the garlic and chilli in the oil and butter until it starts to go golden. Using a slotted spoon remove the kale from the water and toss into the butter and garlic mix - you want to keep the boiling water as the gnocchi goes in next.

While the gnocchi is cooking, stir the butter, garlic and chilli through the kale and season well. Toss in the talleggio, half the basil and half the pine nuts - stir through. When the gnocchi rises to the top of the water, it is cooked. Drain and toss into the kale mixture.

Smear a ladle full of the tomato sauce onto the bottom of four warmed pasta bowls or plates and top with the kale and gnocchi. Sprinkle over the remainder of the pine nuts and torn basil, drizzle with olive oil and serve.  A few shavings of parmesan would be great, but I forgot to buy any!!

Friday, March 7

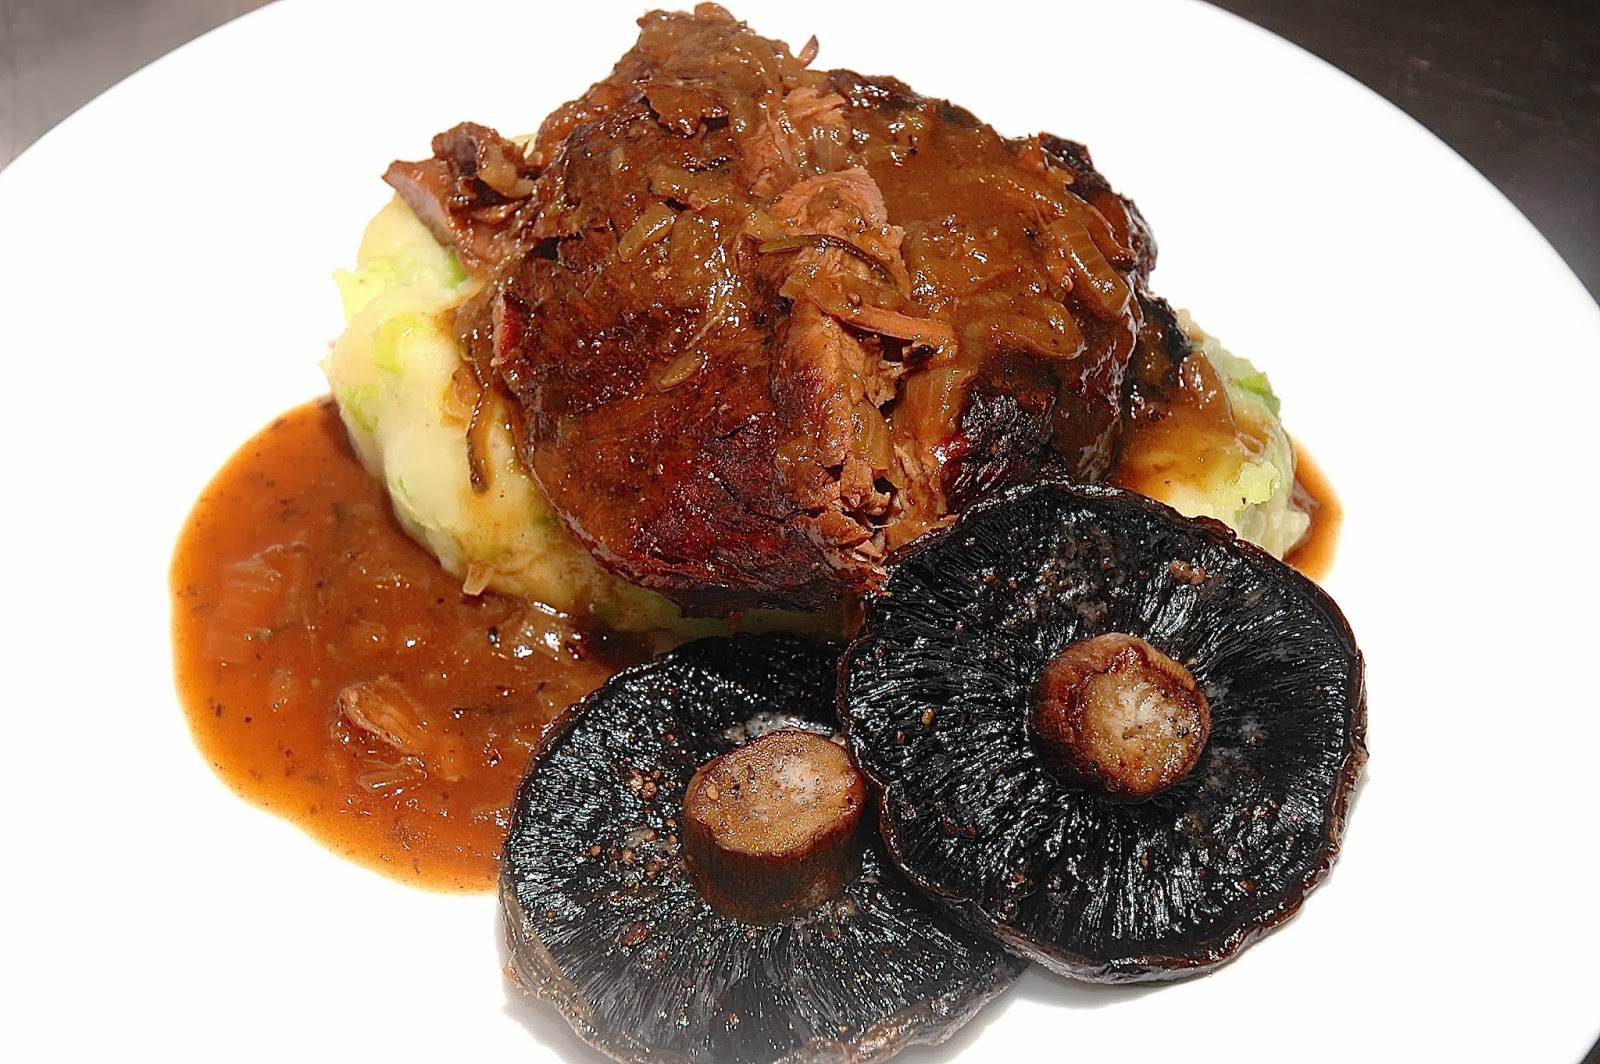
Elizabeth David's Sussex Braised Shin of Beef


Continuing the theme of cheap, tasty and quick midweek suppers, here is a really old English dish from the book 'At Elizabeth David's Table'. I have tinkered with the recipe a little and whilst not quick to cook (it is a braise after all), the prep effort is minimal. Get the dish together on the weekend and then bung the lot in a slow cooker before you go to work, you will come home to a very welcoming smell in your kitchen. The flavour of this stew is very deep and without the need for meat stock. If you don't have any port, use red wine and a tsp of sugar. For four:

Ingredients:
1.2kg shin of beef - boned and trimmed weight
1x 440ml can of guinness or dark beer
100ml cheap port
2 tbsp mushroom ketchup
1 medium onion, peeled and finely sliced
1 tbsp plain flour
A little veg oil
2 sprigs of thyme
1 sprig of rosemary
2 bay leaves
Lots of black pepper and salt to taste

Method:
Heat a large frying pan on the stove until smoking. Heavily season and oil the beef and fry until really crusty and brown on one side. Flip the beef and toss in the onions. Colour the beef to the same degree on the other side and fry the onions at the same time stiring occasionally so they don't burn. Remove the beef and add the flour stirring well into the onions. Remove the onions and put into the bottom of a slow cooker with the herbs, beef on top along with any juices. Deglaze the pan with the guinness, mushroom ketchup and port. Allow to bubble a little then add to the slow cooker. Season the stew with more black pepper and salt. 

You can stop here if you like and the beef will keep in the fridge for a few days until you want to cook it. In the morning before you go to work, set the slow cooker to low and set to braise for 5 hours. The stew gets better after a couple of days so you can leave in the fridge when cool and reheat later in the week.  Any leftovers make a great pie filling or can be shredded back into the gravy and run though some pasta with parmesan for more Italian twist.

I served mine with colcannon mash and roasted field mushrooms. Tear chunks off the beef (it will fall apart) and knapp over the gravy. 

Thursday, March 6

My Dad's Sausage Meat Plait


I have a bit of free time on my hands at the moment and decided to do a bit of cooking for the family...you know...proper mid-week supper type stuff. This got me thinking that it might be interesting to do a mini series of dishes that fit the mantra "tasty, cheap and quick". So here we go…

My Dad used to make this for us all the time when I was a kid. In fact the only other dish he cooked was a weird rice salad of green peppers, onions and frankfurter sausages. This sausage plait is great, basically just a giant sausage roll and none the worse for it. The rice salad, not so great. Sorry Dad!

Ingredients:
Ready rolled puff pastry from the supermarket
1 pack of really good quality sausages
1 bunch of flat leaf parsley
1 medium red onion, peeled and very finely chopped
2 tbsp sweet chilli sauce
1 egg, beaten

Method:
Set the oven to 190c. Take the skins off the sausages and mix the meat with the onion, parsley and chilli sauce. Season the mix with lots of black pepper and a reasonable amount of salt. Unroll the pastry and shape the meat in the middle - you want a long sausage of even thickness running end to end along the centre of the pastry as if you were making a sausage roll. Using a sharp knife, make cuts along both free edges of the pastry, 2cm apart from the meat to the edge of the pastry. 

Egg wash and start to plait from one end, folding one pastry strip at a time over the meat at 45 degrees. Follow this with one strip from the other side and……urggh. This is really difficult to verbalise. If you struggle (and you really shouldn't as it is so easy) go and ask a six year old girl with long hair to show you how to plait hair. Hmmm….if you are a middle aged man perhaps don't ask a random six year old girl…..maybe look up 'how to plait' on Google. Moving on.

Egg wash the whole thing and place on baking parchment and then on a sturdy baking sheet. Bake for 35 to 45 mins until golden and piping hot in the middle. I served mine with mash and purple sprouting. Ketchup is the sauce of choice.


Friday, February 28

Duck Spring Rolls, Sweet Chilli Hoisin Dipping Sauce

Greasy spring rolls from the Chinese takeaway may become a thing of the past once you have tried my version. Now I'm not planning to send my dinner off to a lab for calorific analysis, but I'm pretty sure these spring rolls are quite healthy. I managed to get a whole bag of supermarket prepared stir-fry veg into just four spring rolls and according to the blurb on the bag, this is two of my five a day. If you use my technique of sealing the spring rolls with flour paste, very little oil gets inside and they were super crispy but not greasy at all. With this justification at the forefront of my mind, I scoffed the lot.  Really easy to prepare, it took me just 10 minutes to make up the spring rolls and a few minutes more to fry…it's got to be worth go right….?

Ingredients:
6 Spring roll wrappers - you can get these frozen from Chinese stores
1 bag of ready prepared stir fry vegetables
A knob of ginger, peeled and finely chopped
A clove of garlic - peeled and chopped
1 tbsp of soy sauce
A handful of shredded duck, chicken, pork or whatever you fancy
Vegetable oil for frying
2 tbsp hoisin sauce from a jar
1 tbsp sweet chilli sauce
1 tbsp flour

Method:
Add a tbsp of oil to a frying pan and get on a really high heat - you need to cook away any water that comes out of the vegetables so make sure the pan is smoking hot. Quickly fry the ginger and garlic and when just starting to colour add the vegetables, stir frying until softened. Add the duck and soy sauce, and bubble away to nothing. Take the pan off the heat and allow to cool. 

If your spring roll wrappers are frozen you can sometimes get a knife between the sheets and carefully ease off 5 or 6 in a lump. You can then put the rest back in the freezer for another day. I stated six spring roll wrappers on the ingredients list as sometimes when you separate the sheets, you tear a few - I only used four.

Make a thick paste (think wall paper paste) from the flour and a little water. Now take a spring roll wrapper. Place 1/4 of the duck mix along one edge leaving an inch or so clear each side. Tightly roll up half way. Rub a little flour paste along both side edges and along the edge furthest from you. Fold the sides in then continue to roll up completely using a little more flour paste to seal any open edges. I'm not sure I need to describe what the finished product should look like - a spring roll, clearly! Repeat for the other three spring rolls and set aside.

Heat your deep fat fryer to 180c or put about an inch of oil in a deep pan. If using a pan you can tell the oil is hot enough by dropping in a little bit of bread - it should cook to golden in about a minute. Fry off the spring rolls (in batches if necessary) until golden and crispy.  Drain on kitchen roll.

While frying, mix the hoisin with the chilli sauce and a little water. Have a taste. All shop bought sauces vary in flavour so try adding a little honey or lime juice to correct the dipping sauce to your taste. Tuck in.

Tuesday, February 25

Crisp Roast Gressingham Duck, Duck Fat Potatoes, Pedro Ximenez Jus


This is an absolute belter of a dish and could make for a simpler Sunday roast for those whom excessive veg prep is a chore. The duck is slow roasted to crispy perfection over a pan of potatoes flavoured with garlic and rosemary, the gently rendering duck fat providing the necessary lubricant to deliver crisp edged flavoursome spuds.  This cooking method will not deliver pink breast meat, it will be cooked through and falling from the bone - think Chinese shredded duck.

However the real star of the show is the Pedro Ximenez jus (or gravy in less poncey terms). Pedro Ximenez is a sticky sweet sultana scented sherry from Jerez in Spain. Temper this sweetness with vinegar and meat stock and you pretty much have the perfect duck sauce. I more or less devoured the whole duck alone, ripping crisp skin and butter soft fatty meat from bone, shoving it into the sauce and then my mouth like a mad man.

For 2 or maybe three people at a push:

Ingredients:
1 Gressingham Duck
1 kg of potatoes (Maris Piper) peeled and cut into chunks
2 sprigs of rosemary
4 fat cloves of garlic, skin on

For the sauce:
250ml meat stock - beef, chicken or ham are all good, not lamb though
50ml Pedro Ximenez, maybe a little more to taste
100ml of good red wine
2 tbsp good red wine vinegar
1 tsp sugar
1 scant tsp arrowroot slaked in a little cold water

Method:
Heat you're oven to 220c. Spatchcock the duck by cutting out the backbone with a sturdy pair of scissors. Flatten the bird, season well and place straight on the bars of the oven rack with a suitable roasting tray placed below to catch the juices. The addition of a little water to the roasting tray stops the juices burning before the fat has properly rendered, the water will evaporate before you need to roast your spuds leaving only hot oil.

Roast the duck for 30 minutes then drop the oven temperature to 150c and cook for another hour and a half. Blanch the spuds, drain then chuff up the edges so they crisp well. Turn the oven back up to 200c and toss the spuds into the oven tray with the duck fat, the rosemary, the garlic and a good seasoning of Maldon salt. Roast for another 30 to 40 mins turning the spuds every so often until the edges are crisp.

While the spuds are roasting make the sauce. Boil the vinegar to almost nothing then chuck in the wine, stock and sugar and reduce by half. Add the sherry and simmer until the alcohol has burnt off - you will taste this as the harshness will disappear leaving only the flavour. You can add a little more sherry if you think it needs it. Add the arrow root and allow to thicken, pass through a sieve and keep warm.

Check your duck - the skin should be golden and crisp and the leg bones should feel loose, as if you could pull them from the bird leaving the meat behind. Serve up - the only accompaniment required is some good red wine and some steamed greens……..and maybe a bib.

Saturday, February 15

Wye Valley Smoked Salmon, Dill, Capers, Lemon & Crème Fraîche

You don't see smoked salmon on menus that much anymore. Sure it appears in bagels with cream cheese and alongside eggs as a affordably luxurious brunch, but not really as a stand alone dish. I guess it is seen as a bit 80's, a bit passé, a little naff in todays climate of molecular gastronomy and Nordic foraged bleeding edge cuisine. 

Well I'm nearly forty and my days of following fashion have long gone…..and like a comfortable pair of corduroy trousers, I'm quite partial to a bit of smoked salmon. Invest in a well made product, not the supermarket mass produced crap. Severn & Wye Smokery (www.severnandwye.co.uk) produce the some of the best I have tasted. Treated here with simplicity alongside some good bread, fresh from the oven……great tasting plates of food never go out of fashion. Serves 2 as a starter or light lunch.

Ingredients:
Good smoked salmon - 200g
Dill - 1 small bunch, leaves separated from stems
Unwaxed Lemon - 1, zested
Quality Crème Fraîche - 1 small pot
A little of your best extra virgin to drizzle
Capers - try and get the small 'lilliput' ones
Some fresh brown bread and butter

Method:
Not really much to say here, I'm sure you can look at the photo and repeat. I piped the crème fraîche using a piping bag - give it a little whisk to loosen beforehand - but a few spoonfuls artfully drizzled would taste just the same.

Sunday, February 9

Melanzane in Carrozza


Just the most perfect little veggie lunch dish from Napoli. The Italian translation of 'in Carrozza' means 'in a carriage' - not sure this is relevant or even that interesting but there you go…

The addition of lentils to the tomato sauce is my idea and therefore in-authentic, but they do make the whole more substantial. For four:

Ingredients:
1 large carrot, peeled
2 sticks of celery
1 small leek, washed and trimmed
1 small onion, peeled
Olive oil for frying
Italian brown or puy lentils - 200g
Vegetable stock - from a cube is fine
Extra virgin for frying
4 cloves of garlic, peeled and finely chopped
1 sprig of rosemary, thyme and a bay leaf
2 quality tins of chopped tomatoes
1 bunch of basil, leaves separated from stems
2 balls of buffalo mozzarella
1 beaten egg
2 large aubergines
Plain flour -  1 large handful
Grated parmesan -  1 large handful
Breadcrumbs -  1 large handful
Balsamic glaze to drizzle

Method:
Slice the aubergine lengthways into 4 long slices of equal thickness (1.5cm) trimming the skin off the end pieces. Lightly season and oil and grill gently on a griddle until very soft and lightly char-marked. Set aside on a tea towel to cool.

Finely dice the carrot, celery, leek and onion and gently fry in olive oil until soft. Add a little garlic, the rosemary, thyme, bay leaf and the lentils. Just cover with vegetable stock or water and simmer until soft topping up with a little water if it needs it.  You want the lentils to be dryish when cooked.

Next make a basic tomato sauce by adding 50ml of olive oil to a sauté pan and gently fry the remainder of the garlic until it starts to go golden. Toss in the tomatoes and gently simmer with a good pinch of salt, black pepper and sugar until the tomatoes start to break down. Add the lentils and adjust the seasoning. Keep warm.

Cut the mozzarella into slices, top one slice of aubergine with the cheese and a basil leaf or two. Sandwich with another slice of aubergine and press together well. Repeat until you have four aubergine sandwiches. Dip into the beaten egg and dredge in the breadcrumb mix. Gently fry in 1 cm of olive oil until golden and then flip over. You may have to fry off the aubergine in batches - keep warm on kitchen roll.

Warm the sauce and tear in the remainder of the basil. Spoon onto warmed plates and top with the aubergine slices. Finish with a drizzle of good extra virgin, some balsamic , basil and more parmesan if you wish. 

Saturday, February 1

Chopped Chicken Livers on Toast, Bacon & Sage Crumbs


I like to try and have something 'on toast' permanently on the menu at the pub. If you make your own bread (which we do) then it is a great way to use up yesterdays loaf and avoid waste. Soft; rich; buttery chicken livers on charred bread with crispy bacon and astringent mustardy leaves……it's a very rustic and very good toast topper. 

Oh and a little tip here: when you make a vinaigrette, whisk the salt and sugar into the vinegar mix before you add the oil. The salt/sugar grains will not dissolve easily once you add the oil leading to a grainy dressing……no-one ever tells you this on TV……you heard it here first folks. For two:

Ingredients:
Organic chicken livers - 250g
Milk for soaking
Good bread - 2 slices about half an inch thick
Some interesting salad leaves - a large handful
Butter - 50g
Dry cure streaky bacon - 4 rashers
Sage - a small handful of leaves, stalks discarded
Red wine vinegar - 2 tsp
Sugar - 1 tsp
Olive or vegetable oil - maybe 100ml
Dijon - 2 tsp

Method:
Pick through the livers and pull out any white bits - these are the cores of the livers and can be a little bit stringy. Soak the livers in milk for and hour or two, then rinse and dry on kitchen roll. Roughly chop and set aside. In a roomy pan warm a half the butter and fry the bacon over a medium-low heat until really golden and crispy. Remove from the pan and allow to drain on kitchen roll and cool down. Toss the sage into the same pan and fry until crisp, remove and add to the bacon on the kitchen roll.  Keep the pan on the heat - we will use it again in a minute.  When the bacon is cool, roughly chop with the  sage to make a course crumb. 

Toast your bread. Make a mustardy vinaigrette with the dijon and red wine vinegar, a good pinch of sugar, pepper and salt. Whisk well until the grains have dissolved then beat in veg or mild olive oil a little at a time until the dressing thickens - set aside.

The pan should be quite hot now.  Toss in another knob of butter, crank up the gas and throw in the livers. Season well and add a tiny dash of red wine vinegar, stir fry to your liking - I cook mine to medium.  Dress the leaves, top the toasts with the livers spooning over any pan juices that remain. Sprinkle with the bacon and sage crumbs.

Sunday, January 26

Pad Thai Noodles with Chicken and Prawn


If you have been to Thailand then this dish needs no introduction. Available on every street corner from the mental Khao San road in Bangkok to bamboo shack beach restaurants. It is the backpackers staple, mainly because it is cheap, tasty and filling meaning more cash can be reserved for ice cold Singha beers. I have eaten these noodles countless times in a myriad of now forgotten places - this version is an amalgam of the best ones. 

If you get the time, try and find your local Asian supermarket as you will be staggered how economical items are compared to supermarkets. I got most of my ingredients from Teohs on Lower Ashley Road in Bristol - a fantastic treasure trove of a shop. Serves 2 to 3.

Ingredients:
Vegetable oil
Garlic - 3 fat cloves, peeled and sliced
Spring onions - 1 bunch, cleaned and sliced, green bits and all.
1 small onion - peeled and finely sliced
Bean sprouts - approx 150g
Crushed red chilli - 1 tsp
Rice noodles - 100g
Eggs - 2, beaten
Prawns - 100g
1 small chicken breast - finely sliced
Blanched peanuts - 50g
Fresh coriander - 1/2 a large bunch, leaves and stems chopped separately 
Limes - 2
Fish sauce - 2-3 tbsp
Sweet chilli sauce - 2-3 tbsp

Method:
Put your noodles in a large bowl and cover with boiling water. Leave to stand for 5 mins or so and when tender, drain, refresh in lots of cold water, drain again then toss them in veg oil to stop them sticking.

In a large frying pan or wok, gently fry your peanuts in quite a lot of veg oil until dark golden (maybe 50ml of oil). Drain reserving the oil and set aside to cool. Once cool, roughly crush and set aside. Get the pan back on a high heat and tip in the peanut oil you reserved. Start to fry off the onion, chilli and garlic and when just starting to colour toss in the chicken and most of the spring onion and bean sprouts. When the chicken is almost cooked through, push all the pan contents to one side and fry the beaten eggs on the clear side of the pan. When the eggs have scrambled, mix everything together again and toss in your noodles, prawns, a handful of the crushed peanuts, the fish sauce and chilli sauce to taste. Also throw in the chopped up coriander root at this stage as it has bags of flavour

Keep stir frying until the noodles are hot and the chicken is fully cooked. Taste and add more chilli and fish sauces to your taste.  Serve on a large platter and sprinkle generously with the rest of the peanuts, raw bean sprouts, spring onion, the coriander leaf and lime wedges. 

Saturday, January 25

Tarte au Citron Brûlée

The classic lemon tart, subtly enhanced with an almond pastry and thin crisp veneer of caramel on top. The tart must be served immediately after you have brulee'd it and will not keep well in the fridge. Best to make on the day, serve warm and blowtorch at the table for maximum effect.

Pastry:
100g Unsalted Butter
50g Caster Sugar
150g Ground Almonds
200g Plain Flour
1 Egg

Lemon Filling:9 Eggs
400 g Caster Sugar
Grated zest of 2 lemons
Juice of 5 lemons
250 ml double cream


Method:
Bung all the dry ingredients for the pastry into food processor and blitz with the butter. Unlike normal pastry you need to allow the pastry to blitz for a good couple of minutes. Add the egg and pulse to  bind. This pastry is a bugger to roll out so roll the pastry between two sheets of parchment or clingfilm  Remove one layer of the parchment and then upturn the pastry into a greased 20cm loose bottomed flan tin. Remove the other piece of parchment (which should be on top) and push well into the tin with your fingers. Any cracks can be repaired by patching up with any spare pastry.  Leave the pastry overhanging the edges of the tin. Line the pastry with cling film and then fill with baking beans. Blind bake at 200c for 30 minutes removing the cling film and beans 10 minutes before the end of the cooking time. Allow the pastry to cool then trim the edge of the tart with a serrated knife. If you have any small cracks, paint with beaten egg and return to the oven for 30 seconds to cook the add and thus seal the crack.

To make the filling, whisk the eggs with the caster sugar and lemon zest until smooth. Add the lemon juice and cream. Continue to whisk until all the ingredients are thoroughly combined. Skim any froth from the top then pour into the tart case. Bake at 120c for 30 to 40 minutes until the centre of the tart just wobbles like jelly when given a gentle nudge. If the filling looks too liquid, give the tart another few minutes.  Remove from the oven and allow to cool at room temperature for 1 hour before serving. Don't refrigerate or the flavours will be dulled and the tart filling has a tendency to crack. 

Just before serving dust with a thin layer of caster sugar and using a blowtorch, brûlée the top. Serve with pouring cream.

Saturday, January 18

Prawn & Spring Onion Pakora, Cheats Mint Raita


Who doesn't love those fried Indian spiced snacks from the curry house? This is kind of a 'throw it together' recipe and as long as you get the batter to the correct consistency, you can pretty much add what ever ingredients you have. Some shredded vegetables or onion, cooked lamb, chicken or flaked fish would all work well. The cheats raita sounds a bit pikey but the end result is surprisingly authentic……trust me.

Obviously these go great with an ice cold lager, but then don't most things?

Ingredients:
Gram flour (chickpea) - 100g
Garam masala - 1 tsp
Mild curry powder - 1 tsp
Salt - 1 tsp
Pepper - 1/2 tsp
Cooked prawns - 100g
Fresh coriander - 1 small bunch, roughly chopped, stems and all
Spring onions - 1 small bunch, finely sliced
Vegetable oil for shallow frying

For the Raita:
1/2 cucumber
200 ml greek yoghurt
2 tsp of mint sauce from a jar
A pinch of sugar and salt

Method:
Grate the cucumber and squeeze the resultant mass of all excess juice. Add the squeezed cucumber to a bowl and mix with the yoghurt and mint sauce. Add salt and sugar to taste. Depending on how acidic the mint sauce, you may also need a little squeeze of lemon to lift the flavour. 

The batter needs a little bit of care when mixing as you need the right consistency. I won't give a measure of liquid as it depends on how wet the ingredients are that you add (fresh prawns are drier than frozen etc). Put all the ingredients in a bowl except the oil and mix well. Add milk or water a tbsp at a time until the mixture binds together in a wet mass that holds it's shape. You don't want a thick bread dough like consistency, nor should the batter pool and drain away from the ingredients. Something in the middle is required, like cake batter. This all sounds very complicated but if in doubt fry off a single pakora. If the thing falls apart more flour is required, if the end result is too doughy, add a little more liquid.

Heat about 1cm of oil in a pan over a medium/low heat (about 150c is perfect). Spoon 1 tbsp of the prawn mix into the oil and flatten the pakora to about 1/2 inch thick. Add as many to the pan as you can without overcrowding. When the pakora are golden brown on one side, flip and colour the other sides. Drain and serve hot.